|
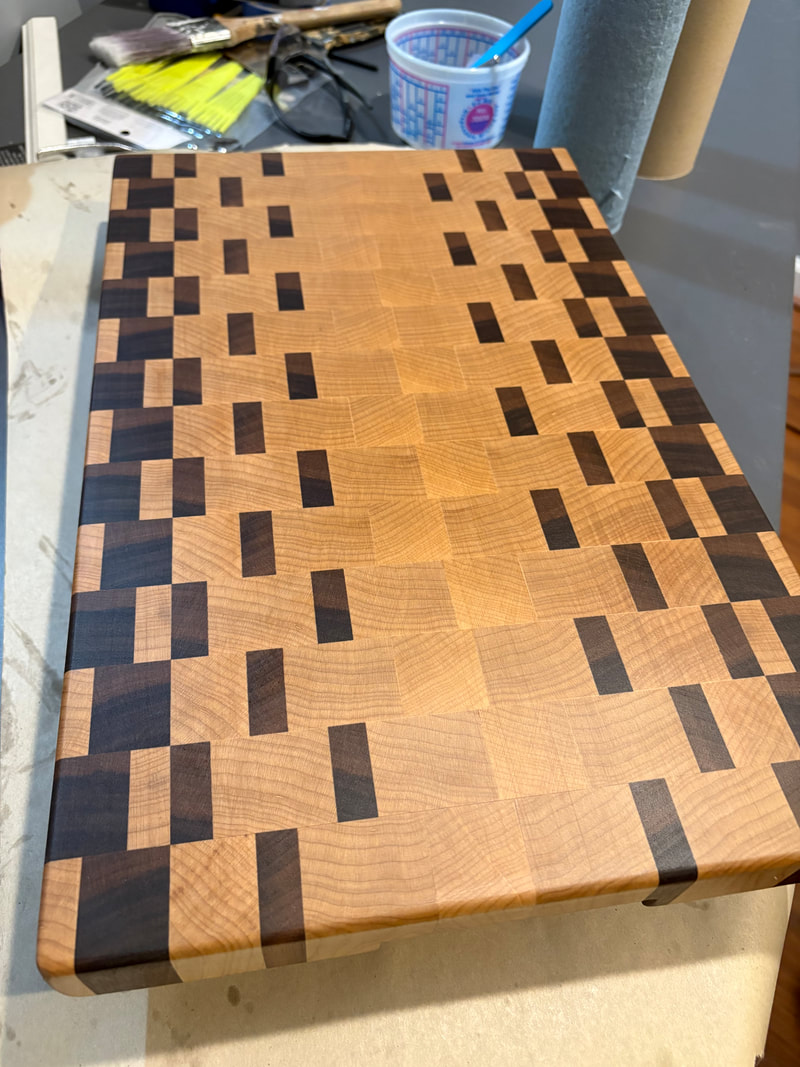
Finally started making some end grain cutting boards. Why "End Grain"... they are so cool and functional. Cool... Search for these on the internet and be ready to be dazzled with the design possibilities. I went to www.cuttingboarddesigner.com to find step by step instructions. The board i chose was called "Fade" using maple and walnut. I started with 2" thick wood and flattened and planned to 1.5". 1) First glue up was alternating strips using a pattern suggested by the web site. 2) Then i cut that glue up into 1.7" strips going cross pattern. 3) Lay the pattern out ... flip every other piece... then turn them grain up. 4) Glue up again. This was a challenge as i was working with 15 pieces in my design and had to keep those straight and level. A little off on this step as my clamps were a little off but I had some wiggle room that i allotted for in the 1.7" 5) Sand Sand Sand. I have a drum sander which was so helpful. Most people recommend against using a planner at this point as the end grain is difficult to cut on a planner. Did i mention that you should water pop. 6) Lots of cutting board oil. I use Real Milk Paint brand of cutting board oil. Manufactured in Tennessee using food and allergy safe walnut oil. 2-3 coats due to soak in then a coat of wood wax also food safe.
0 Comments
So you have an cutting board that is showing its wear with cut marks and stains.
To refinish you will need to bring the wood to a flat state without cut marks. Use an Orbital Sander (available at Lowes, Harbor Freight, etc. Look for the tag of orbital using round sanding discs. You will need multiple grades of sandpaper. I typically start with 80 grit, then move on to 120 grit, then to 220 grit, and maybe to 320 grit. This is called working the grits. 80 grit sandpaper is rough and 320 grit is almost paper smooth. When working the grits you will need to spend some time and work the entire board. Avoid gouging an area. Use a rubber sandpaper cleaner to clear dust off your sandpaper. Vacuum the board frequently and rub off any dust with cloth or shop towels. Water bursting is done on the final step. This involves spraying the board with water, then letting it dry, then re-sand with the last grit. This step opens the fibers of the wood to get a smoother finish. You can do it between every grit but I find it sufficient to do 1 or 2 grits. Our goal with above it so have a smooth board, remove knife marks, and to remove any old finish. Time to refinish now. I use a product from Tennessee based company called "The Real Milk Paint Company". You can find a similar product at Lowes or similar store called Walrus Oil. What ever product you use, check for food safe contact. Rub the oil or paste into the board and let it sit at least 15 minutes. Wipe the oil off and re-apply. With the liquid product, I go to 320 grit then apply... with paste product, I go to 220 grit and apply. Give it a few days to dry before use. Also there are many products to use labeled cutting board oil, tung oil, etc. AVOID using varnish or polyurethane. If you have a warp in the board, that will likely take a wood worker to restore if that is even possible. A trick for a small warp is to apply rubber feet to one side of the board if the warp is not severe.  Buying Lumber for projects.
We all start with the big box lumber stores (Lowes, etc.) to find lumber. But there has to be a better way. Woodworking Shops (Woodcraft, Rockler) : You could try specialty woodworking shops and these are a great place to find exotics and specialty lumber. The downside to these woodworking shops is price and maybe even location (I live in rural West Kentucky and the closest shop is 3 hours. Local Lumber Mill: Some local mills have a limited selection of wood. The problem is it is rough sawed and not dried. Drying to under 10% moisture requires storing wood for a year or more or building a solar kiln. The advantage is price. Moisture meters are available from amazon, home depot, etc. Search Facebook Market Place Search for Lumber yard with Kiln dried hardwoods. I have several in my area that carry hardwoods such as walnut, maple, cherry, etc. Be sure they have Kiln Dried or you will be in for a long wait to dry the boards. Boards are rough and 8-10 feet long. Cost is excellent. You will need some equipment to process the boards to get them straight and flat. More about the process later. |
AuthorDr Steve Passmore is a local craftsman and publisher of this web site. Archives
December 2025
Categories |


 RSS Feed